Don't miss a digital issue! Renew/subscribe for FREE today.
×
Special Issues
Nov/Dec 2011
Volume 32, Issue 4

Combine Conventional and Digital Methods to Maximize Shade Matching

Edward A. McLaren, DDS, MDC; Todd Schoenbaum, DDS

Shade determination requires dental professionals to understand the science of color, as well as the shade and surface characteristics of teeth. Additionally, dentists must be able to effectively communicate this information to the laboratory, where ceramists are then tasked to interpret the shade information and choose the correct ceramic materials and shades to create highly esthetic restorations that appear indistinguishable from the patient’s surrounding dentition. This article provides current perspectives and information about shade-taking technologies and the advancements and techniques facilitating this process.

Historically, determining the shade of a patient’s natural tooth has presented many clinical challenges.1-4 Early shade guides lacked order and clarity in the arrangement of shades. Consequently, dental professionals often experienced difficulty when determining the proper hue, chroma, and value required in a case. Contributing to these challenges, individual perceptions of shades and user error when incorporating the shade guides led to further incidences of restorations appearing unnatural and needing to be remade. Additionally, dentists have experienced difficulty when attempting to communicate the proper shade to the dental laboratory, since shade guides provided inconclusive results.1-4

Slow to evolve, shade-matching technologies have offered limited support, and shade matching has remained an inherently complex task.1-4 Although the perfect solution has yet to be developed, various shade technologies and concepts have since been introduced to improve the process. Aiding the dental professional in determining the natural shade of the dentition, these technologies have simplified shade-taking and have proven effective in reducing the number of remakes required.1-4 Offering various advantageous features compared to the conventional systems of the past, current technologies are typically placed into three categories: linear or 3-dimensional (3-D) shade guides; use of digital photography in shade analysis; and computerized digital shade guides.1-4 This article will review the classical guide as well as issues with perception, and cover the integration of the three current modalities into the shade analysis process.

Classical Shade Guide

Many dental professionals still use the VITA Classical Shade Guide, (Vident, A VITA Company, www.vident.com) which incorporates the familiar “A” through “D” hue-based system (Figure 1). Although still a useful tool, the last significant modification to this system was made in 1954. However, in the 1960s the VITA Company incorporated a value-based system into the classical guide to aid dental professionals in determining brightness. B1 was listed as the highest value and C4 the lowest value, with in-between values also listed; these values were recommended for use in determining the value of the teeth to be matched. Although this modification provided dental professionals with further clarification of the value of particular shades, clinical challenges remained—the most significant of which continued to be human perception of the color of tooth structures.

In tests of visual perception done at UCLA, the authors found that when there are two objects that have nearly the same value (ie, brightness), the object that demonstrates higher chroma and color intensity will be perceived by the viewer to have a lower value. For example, one of the most common mistakes when determining a tooth color occurs when selecting between A1 and B1 on the classic linear shade guide. When viewed, B1 typically appears brighter than A1. However, A1 is actually the brighter of the two, and this can be seen when the two are photographed in black and white and compared. The incorrect perception is caused by the lower chroma of the B1 shade.

There are other similar examples in the classical shade guide that lead to similar misperceptions. In Figure 2 the value arrangement of the classical guide as measured at UCLA is shown in black and white where it is easier to see value differences. Due to this value/chroma issue with the classical guide, determining the value of shades has remained difficult with the classic system.

Furthermore, the shades between the brightest and darkest values often create color confusion. These clinical challenges have remained because there was no scientific order to this type of shading system when it was developed.

3-D Guide

More than 10 years ago a new shading system was developed to better represent and communicate the existing shade of natural teeth. Based on the three dimensions of color hue, chroma, and value, the VITA 3D-Master® Shade Guide (Vident) addressed dental professionals’ concerns about conventional shade guides (ie, the ability to separately choose value from chroma) (Figure 3). This shade guide system demonstrates improvements in accuracy and ease of use through the incorporation of a value numbering system of 0 to 5. In this system, 0 is the brightest shade and 5 is the darkest shade, with each number representing an equivalent change in brightness. Chroma is then numerically categorized from 1 to 3, with 1 being the lowest chroma and 3 being the highest.

The 3D-Master Shade Guide reduces the risk of improper shade selection from inconsistencies in the clinician’s perception of tooth structure shades. In addition to a separate value and chroma numbering system, 3-D guides also place specific hues in different categories, including left (L), middle (M), or right (R); L represents yellow, M more orange, and R the more reddish portion of the shade guide.

The biggest issue with the 3D-Master Shade Guide has been the lack of ease of removing the shade tabs from the unit’s holder, and the holder itself does not allow placing the individual tabs close to the teeth for evaluation. The authors have found the best way to use this guide is to place the M hues of the six different value ranges in the shade guide holder with the L and R shades removed. By then holding the guide arranged this way next to the teeth for value comparison it is easier to see value differences. Once the value is selected the chroma guide of the chosen value can be compared to the natural teeth to determine the chroma. The authors recommend using a quality digital single-lens reflex (SLR) camera to record the observed/chosen shade. It is also recommended to image one shade brighter and one shade darker for final comparison on a monitor.

Upgraded Tab Holder

The 3D-Master Shade Guide was reengineered with a new Linearguide 3D-Master®, offering a better, more efficient tab holder for evaluation next to teeth (Figure 4). The value guide’s tab holder has the 0 to 5 values in close approximation to each other and all on the same plane, allowing for quick and accurate evaluation against natural teeth. The chroma guide of the selected value is then used to choose the chroma. This guide is ideal for use with porcelains that use the 3-D color system.

Digital Photography for Shade Analysis

One of the most powerful tools in communicating shade information with both patients and dental ceramists is digital photography. Effectively executed digital photography along with the use of Adobe® Photoshop® can significantly help in the shade determination process.

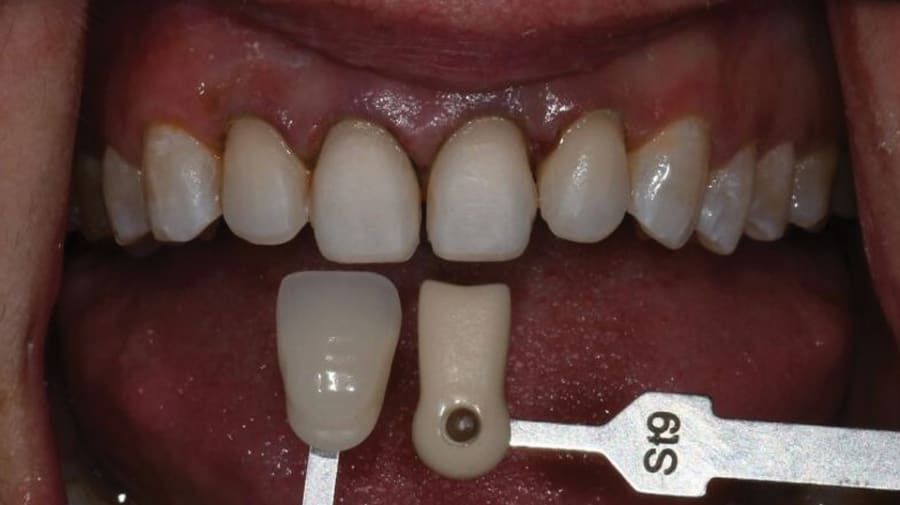
To use digital images to analyze or determine shade, images of the compared tooth and the shade guide are taken in the same vertical plane, ie, the shade guide can not be closer to or farther away than the tooth from the digital film plane (Figure 5). One way to help position and stabilize the shade tab is to flatten the neck and create a shoulder or edge on the neck of the guide. It is strongly recommended to do an image capture in RAW file format, as this is an uncompressed file type with the most color information and is also easily fixable if the camera settings were wrong.

The images are then opened in Photoshop. The images of the teeth and shade guide are then selected and the background outside the area of the teeth and shade guide are turned to black (Figure 6), which allows for a more accurate visual comparison. An area of the shade guide can be selected and then “moved” or dragged onto the image of the natural tooth (Figure 7). This makes it easier to see the difference between the guide and the tooth. A duplicate image is then made and turned to gray scale, making it easy to see the value differences between the shade guide and tooth.

The last Photoshop tool used in the shade determination process is to select the “HSB” color model in the “INFO” palette. When the cursor is placed on the shade guide or tooth, the hue will be given by the “H” number, the chroma by the “S” number (“S” stands for saturation) and the value by the “B” number (“B” stands for brightness). Thus, the difference in value, hue, and chroma between the tooth and guide can be quickly measured. The ceramist would then use this data to choose the correct porcelains to match the natural tooth.

Computerized Digital Shade Technology

The most current shade-taking tools available, digital shade technologies, and software are often used in combination with either conventional classical guides or newer linear and 3-D guides to reinforce shade selections. Used in conjunction with visual shade guides and digital photography, digital shade guides are an important tool in the shade determination process. It has been the authors’ experience at the UCLA Center for Esthetic Dentistry that when all three available shade-taking modalities (ie, visual shade analysis, digital photography shade analysis, and computerized digital shade-taking technology) are used, remakes for shade have been reduced by 80%, even when working with student dentists.

Among the various digital technologies, spectrophotometers adapted for dental shade technology (eg, VITA Easyshade® Compact, Vident; Crystaleye, Olympus America Inc., www.olympusamerica.com) enable dental professionals to quickly determine the basic tooth shade and various color zones (Figure 8).5 These instruments typically store data for various shade guides and utilize fiber optics coupled to spectrometers. Light waves are sent into the tooth and either refracted or reflected back to the receiver in the spectrometer, which then determines shade, hue, chroma, and value. The systems’ digital spectrophotometers have been proven to be a reliable tool for determining the shade of the patient’s dentition.5 However, to ensure optimum, error-free results, digital shade-taking devices should be used in combination with linear and 3-D guides.

Conclusion

In the authors’ experience, using all three modalities for shade analysis—visual, digital photographic, and computerized—and comparing the data has proven to be the most accurate way to finalize exact shade determinate and, more importantly, the best way for reproducing it with either porcelain or composite. Figure 9 shows a case completed using the tri-modality shade analysis process. Using conventional and more advanced digital shade-taking allows dentists to effectively communicate necessary shades and coloring to dental ceramists to help prevent esthetic failures in the restorative process.

References

1. Fondriest J. Shade matching in restorative dentistry: the science and strategies. Int J Periodontics Restorative Dent. 2003;23(5):467-79.

2. McLaren EA. Provisionalization and the 3-D communication of shape and shade. Contemp Esthet Rest Pract. 2000:5:48-60.

3. Stevenson B. Current methods of shade matching in dentistry: a review of the supporting literature. Dent Update. 2009;36(5):270-276.

4. Brewer JD, Wee A, Seghi R. Advances in color matching. Dent Clin North Am. 2004;48(2):341-358.

5. Fazi G, Vichi A, Corciolani G, Ferrari M. Spectrophotometric evaluation of color match to VITA classical shade guide of four different veneering porcelain systems for metal ceramic restorations. Am J Dent. 2009;22(1):19-22.

About the Authors

Edward A. McLaren, DDS, MDC
Founder and Director
UCLA Post Graduate Esthetics
Director
UCLA Center for Esthetic Dentistry
Founder and Director
UCLA Master Dental Ceramist Program
UCLA School of Dentistry
Los Angeles, California

Private Practice,
Prosthodontics and Esthetic Dentistry
Los Angeles, California

Todd Schoenbaum, DDS
Assistant Clinical Professor
Assistant Director
UCLA Continuing Education
Assistant Director
UCLA Center for Esthetic Dentistry
UCLA School of Dentistry
Los Angeles, California

© 2024 Conexiant | Privacy Policy